scani5 Agent Installation (Windows)
Step-by-step guide to install the scani5 Agent on Windows using either the installation wizard, CLI, or Active Directory deployment. The agent continuously collects asset and vulnerability data from the endpoint and reports it to the scani5 platform, enabling exposure discovery and risk prioritization across your environment.
Table of Contents
1. Manual Installation (Wizard)
Follow these steps to install the scani5 Agent manually on an individual Windows system. This method is best suited for single-machine deployments, proof-of-concept installations, or environments where Group Policy–based rollout is not available.
When installing Node.js, enable all dependency-related checkboxes. Ensure you have Administrator privileges on the target machine and a valid scani5 Org Hash from your organization registration before beginning installation.
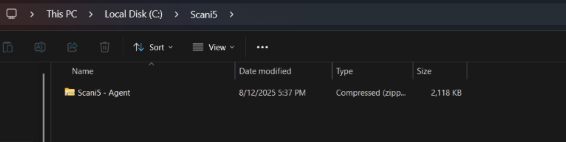
Step 1: Open the extracted release folder
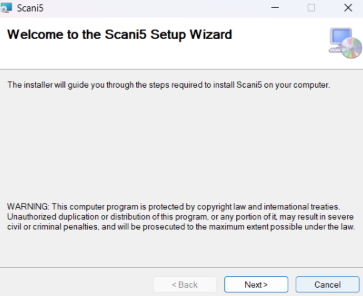
After downloading the scani5 Agent package, extract it to a local directory. Select the Release folder inside the extracted package and double-click the .msi installer to launch the setup wizard.
Step 2: Choose install location
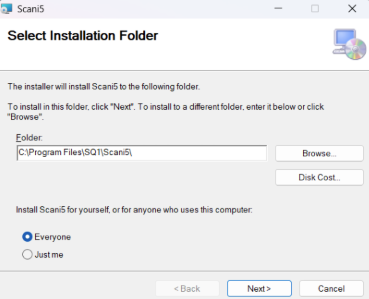
Browse and select an installation path, or keep the default path. Set install scope to Everyone so the agent is available to all users on the machine and can run as a system-level service after installation.
Step 3: Enter organization hash
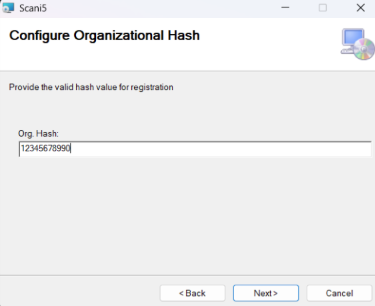
Enter the valid organization hash provided during registration. This hash uniquely identifies your tenant and links the agent to your scani5 dashboard. An incorrect or missing hash will prevent the agent from registering with the platform.
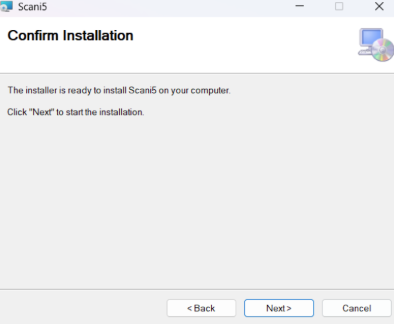
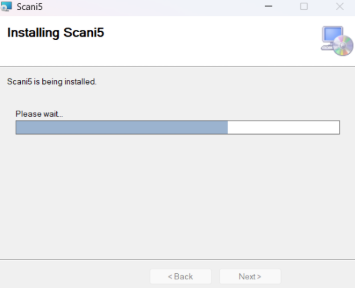
Step 4: Continue and complete installation
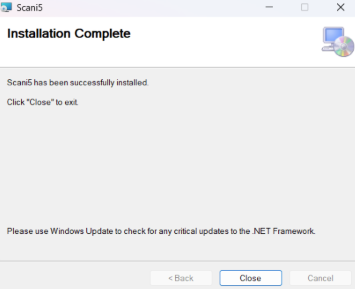
Click Next to proceed through the remaining wizard screens. The installer will copy files, register the agent service, and apply any required runtime dependencies. After successful installation, click Close to exit the wizard.
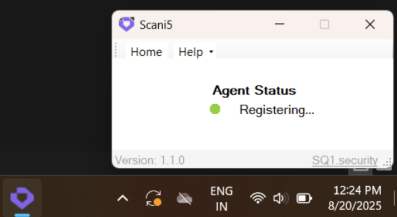
Step 5: Verify tray application
After installation, the agent runs from the system tray and begins communicating with the scani5 platform. Open it from the tray to confirm the application screen is visible and the agent status indicates a successful connection.

2. Manual Installation (CLI)
Use this approach for silent installation or script-based deployment. CLI installation is ideal for automation pipelines, remote administration tools, or bulk installs where no user interaction is required on the target endpoint.
Step 1: Open terminal as Administrator
Run Command Prompt (or another terminal) with Administrator privileges. Elevated access is required to install the MSI package, register the agent service, and write files to protected system directories.
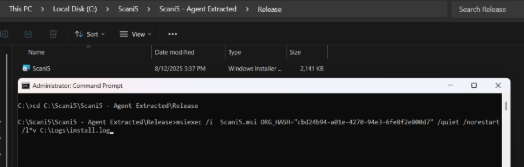
Step 2: Navigate to installer location
Change to the directory containing the extracted scani5 .msi installer. Adjust the path below if your package was extracted to a different location.
cd "C:\scani5 \scani5 - Agent Extracted\Release"
Step 3: Run silent install command
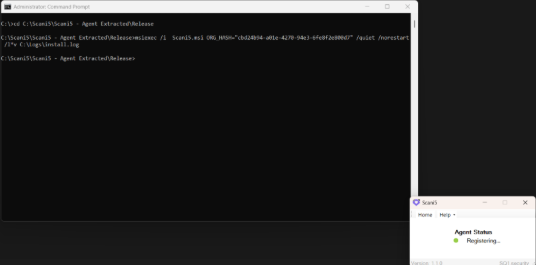
Replace the organization hash value with your actual hash. The /quiet flag suppresses UI prompts, /norestart avoids an automatic reboot, and /l*v writes a verbose log file useful for troubleshooting failed installs.
msiexec /i scani5 .msi ORG_HASH="---provided Org. Hash value---" /quiet /norestart /l*v C:\Logs\install.log
3. Active Directory Installation
Use Group Policy startup scripts to deploy scani5 Agent across domain-joined systems. This method allows centralized, repeatable rollout to entire OUs without visiting each machine individually.
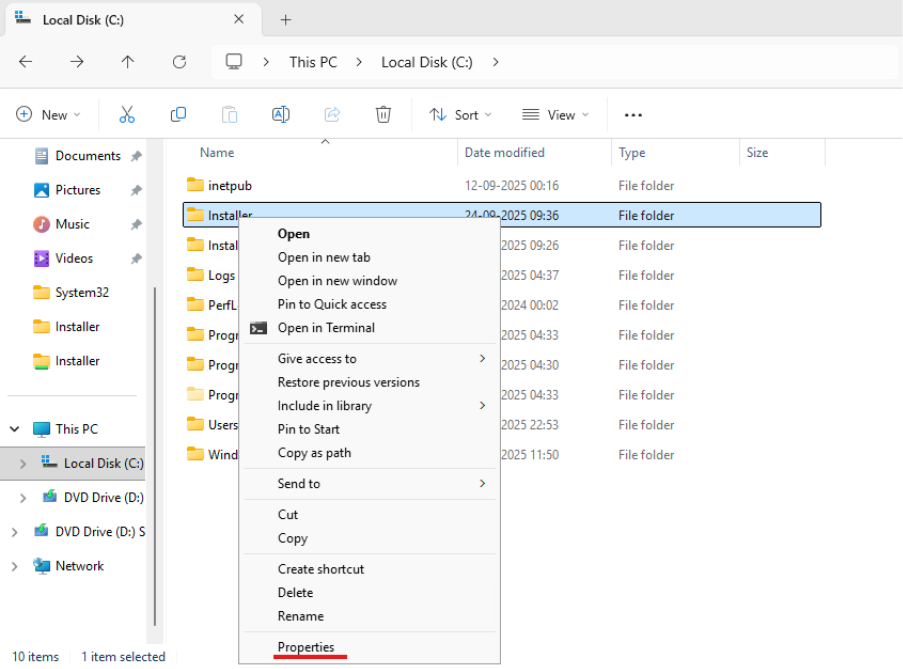
Step 1: Share the installer directory
Place the scani5 MSI (and any supporting files) on a network-accessible location. Right-click the installer folder and open Properties > Sharing to configure network access for domain clients.
Step 2: Share with users
Click Share to open the sharing configuration dialog.
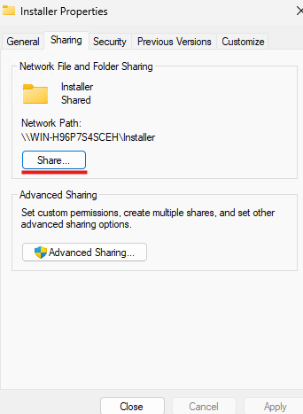
Select Everyone, then click Share. Domain-joined machines must be able to read the installer from this share when the startup script runs at boot.
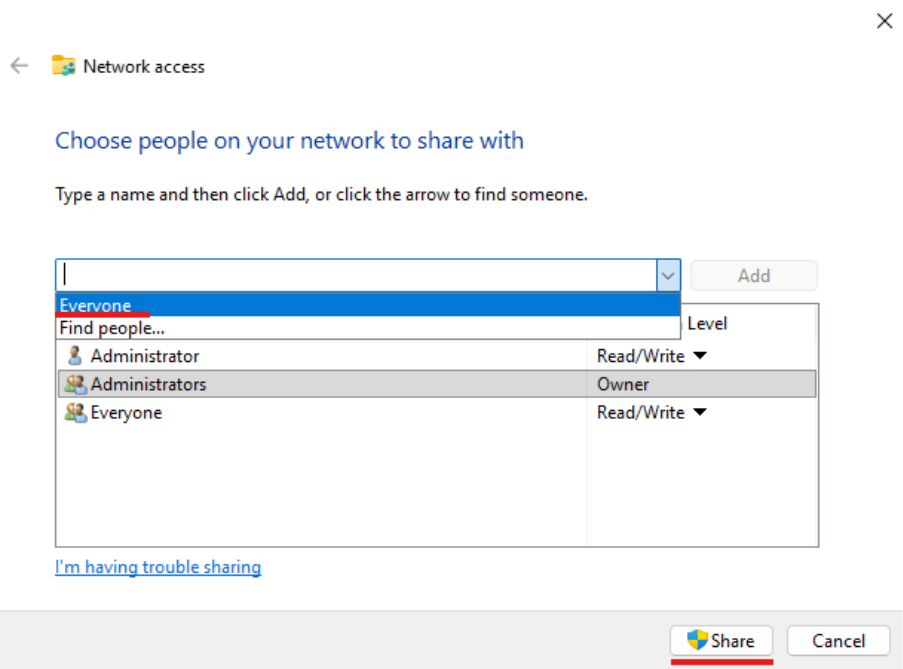
The installer directory is now network-accessible. Note the share name and server hostname—you will need the full UNC path in the installation script.
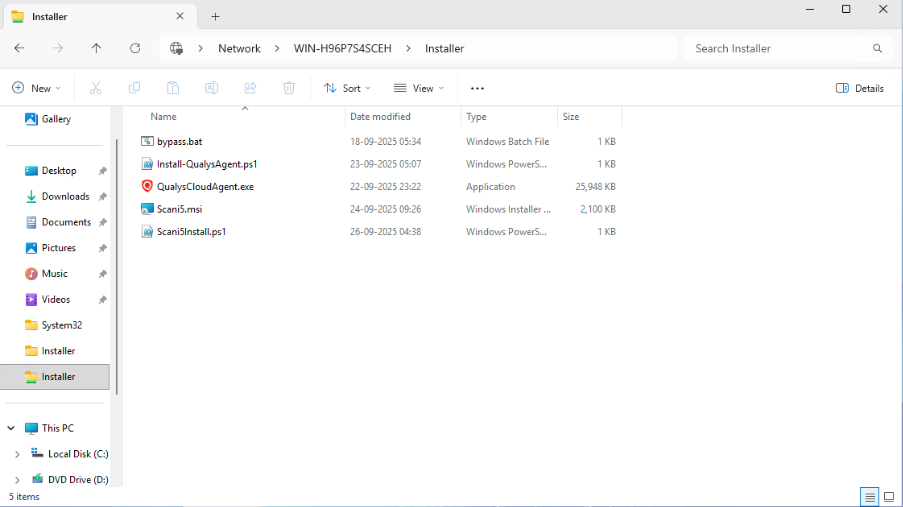
Step 3: Copy full network path to MSI
Get the shared folder path from File Explorer. This UNC path will be referenced in the PowerShell startup script so each client can locate and execute the MSI silently. Example:
\\WIN-H96P7S4SCEH\Installer\scani5 .msi
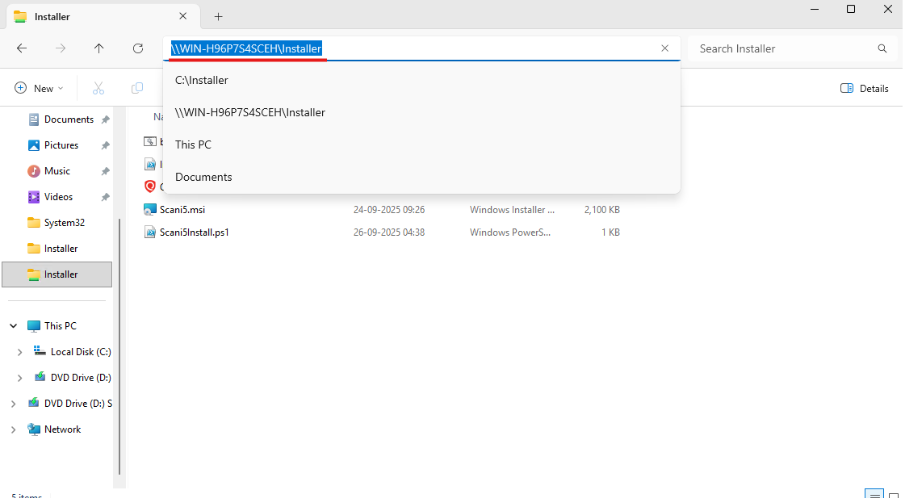
Step 4: Create PowerShell installation script
Create a .ps1 file (for example Scani5Install.ps1) and add the silent install command. Replace the server share path and organization hash with your environment-specific values.
msiexec /i "\\server\share\scani5 .msi" ORG_HASH="scani5 Org Hash value" /quiet /norestart
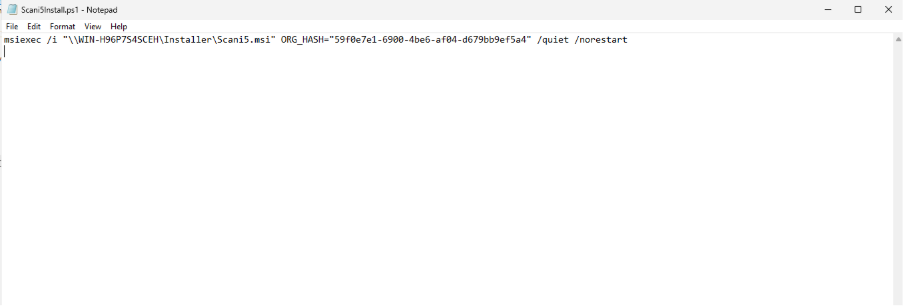
Step 5: Open AD and GPO tools
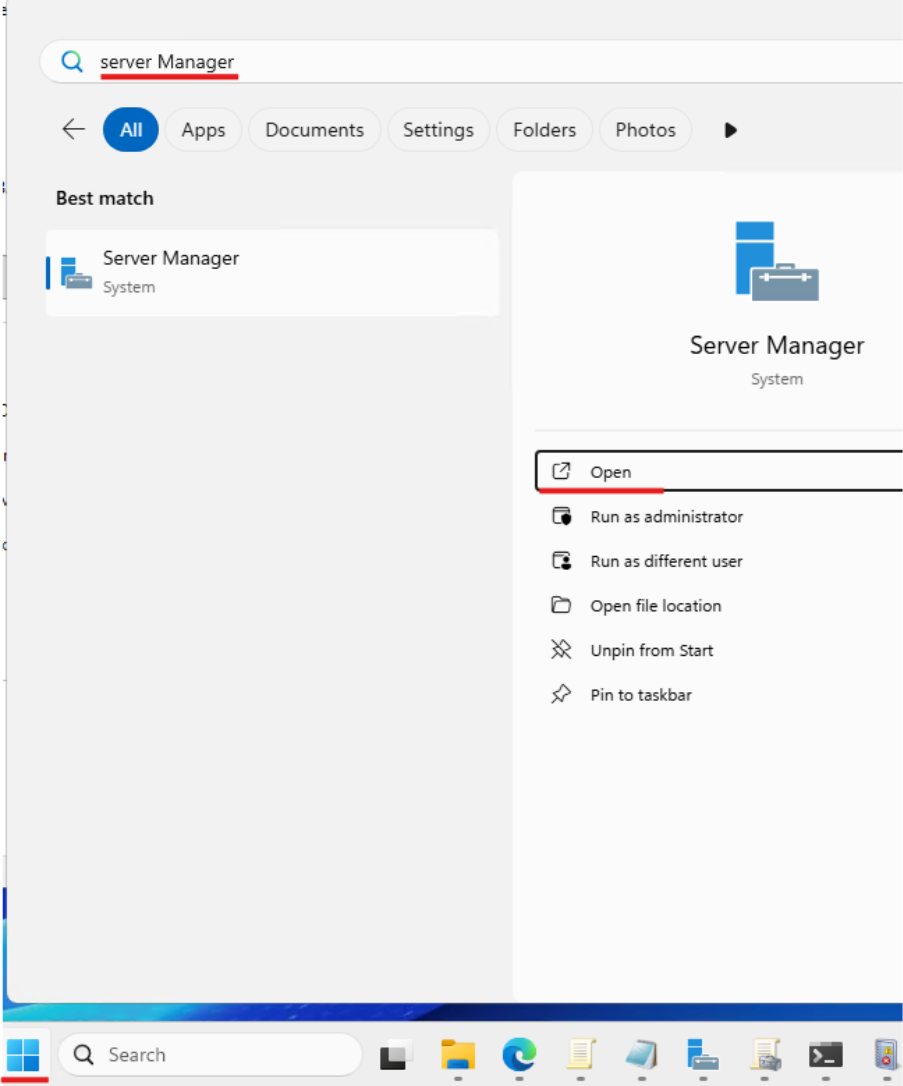
Open Server Manager on your domain controller or management server.
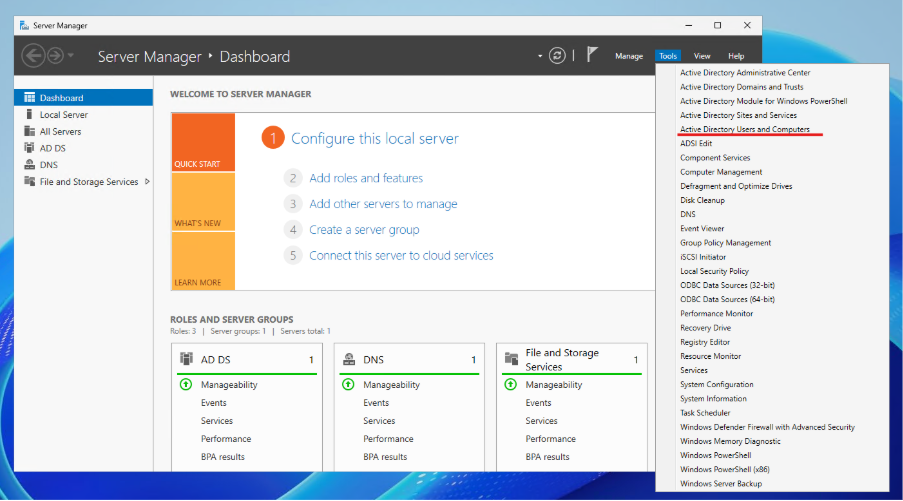
Go to Tools > Active Directory Users and Computers to review the domain structure and confirm which OUs contain the target endpoints.
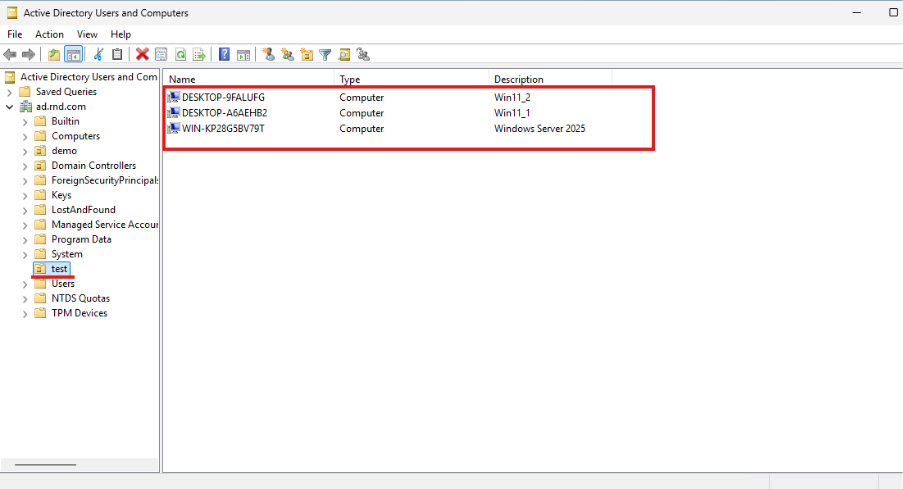
Verify target PCs in the intended Organizational Unit (OU), such as test. Linking the GPO to the correct OU ensures only the desired machines receive the agent.
Step 6: Create and edit GPO
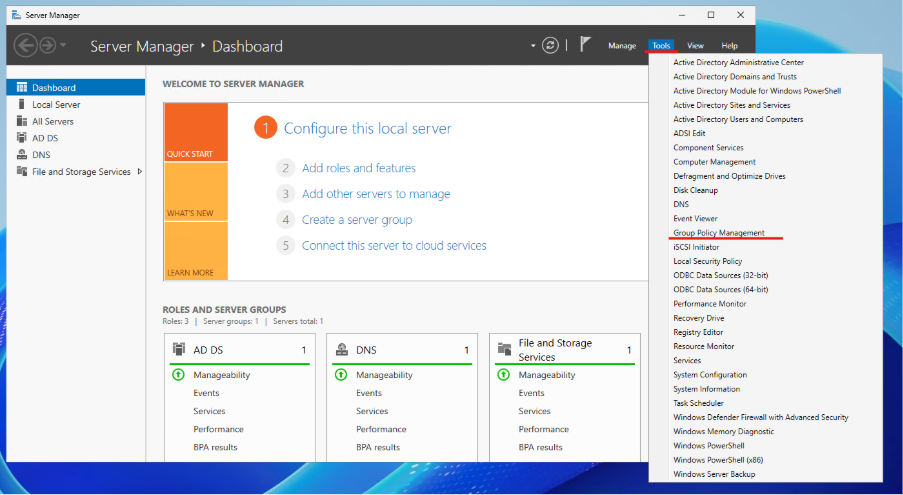
In Server Manager, go to Tools > Group Policy Management to create or manage Group Policy Objects.
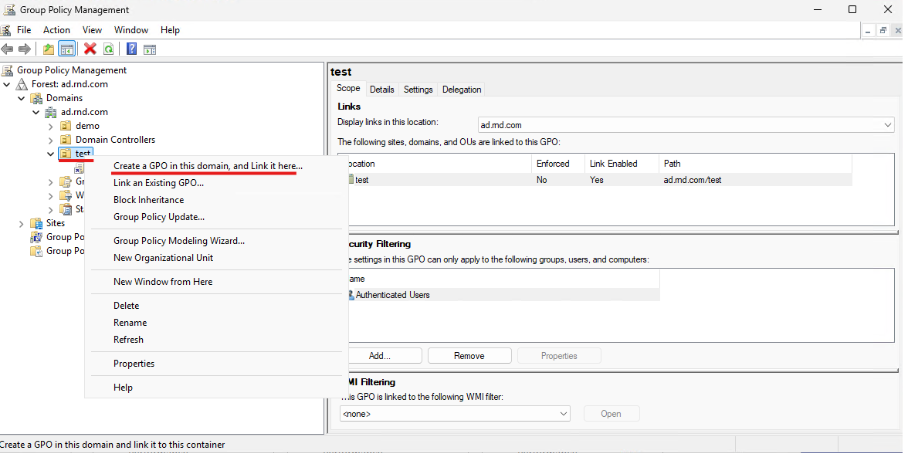
Create and link a new GPO in the domain. Attach it to the OU that contains the computers targeted for scani5 Agent deployment.
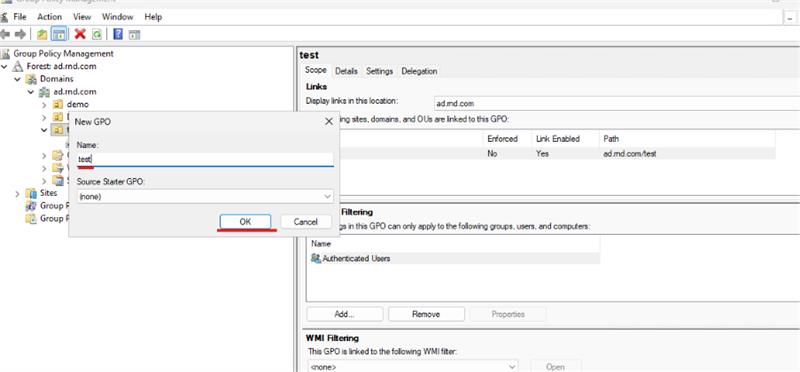
Name the policy (example: test) and click OK. Use a descriptive name so administrators can identify the policy's purpose later.
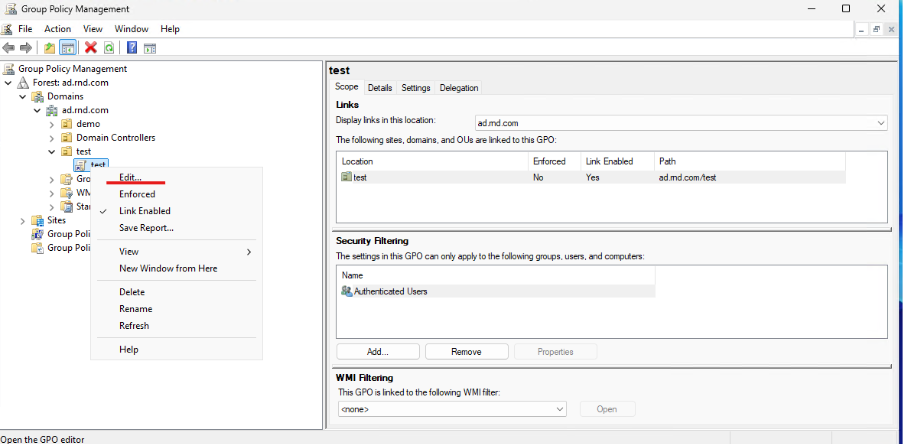
Right-click the created policy and click Edit to configure startup script settings.
Step 7: Add startup script
Go to:
Computer Configuration > Policies > Windows Settings > Scripts (Startup/Shutdown) > Startup
Startup scripts run in the machine context before user logon, which is the recommended approach for agent deployment.
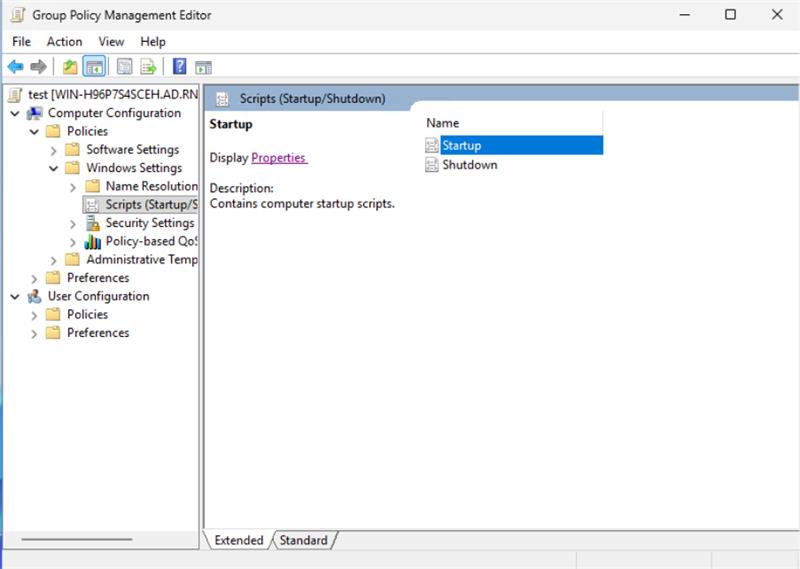
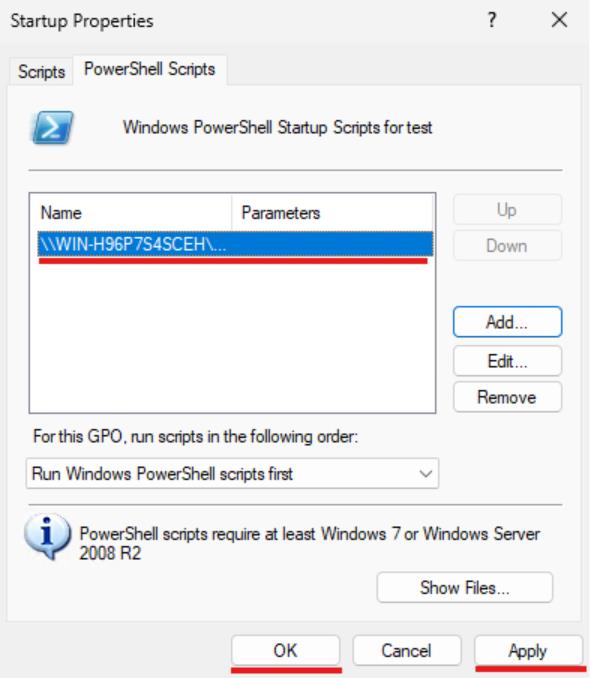
Open Startup Properties, choose PowerShell Scripts, and click Add.
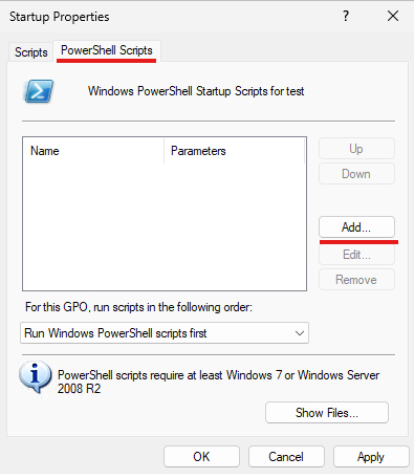
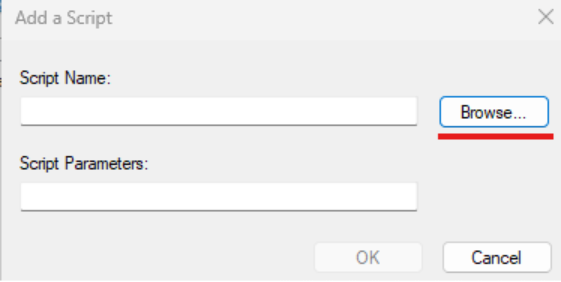
Click Browse to locate the installation script on a path accessible to the GPO editor.
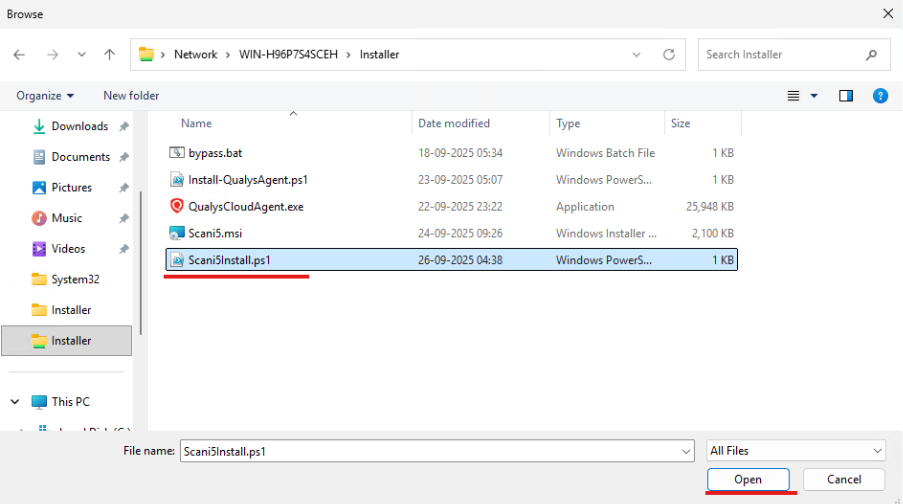
Select Scani5Install.ps1 and click Open.
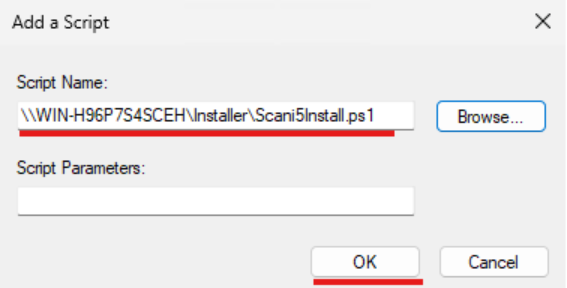
Confirm with OK to add the script to the GPO.
Click Apply, then OK to save the startup script configuration.
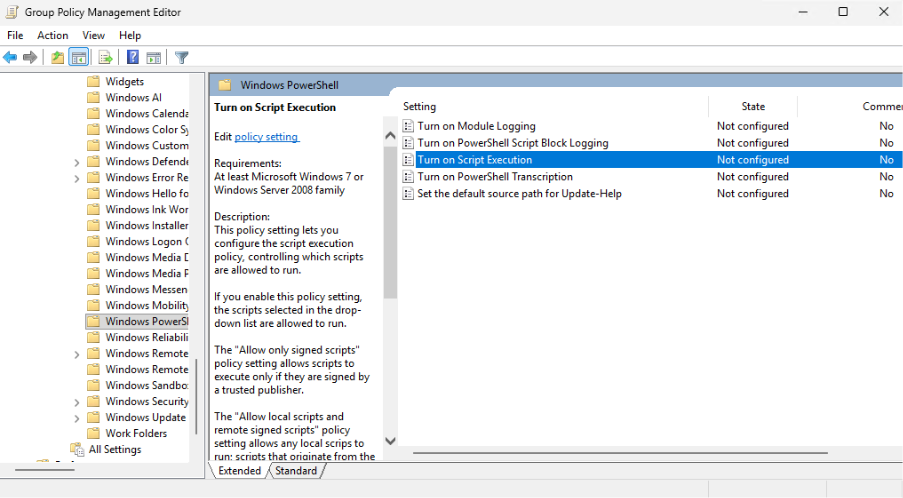
Step 8: Enable script execution
Go to:
Computer Configuration > Administrative Templates > Windows Components > Windows PowerShell > Turn on Script Execution
Without this setting, PowerShell startup scripts may be blocked by the default execution policy on client machines.
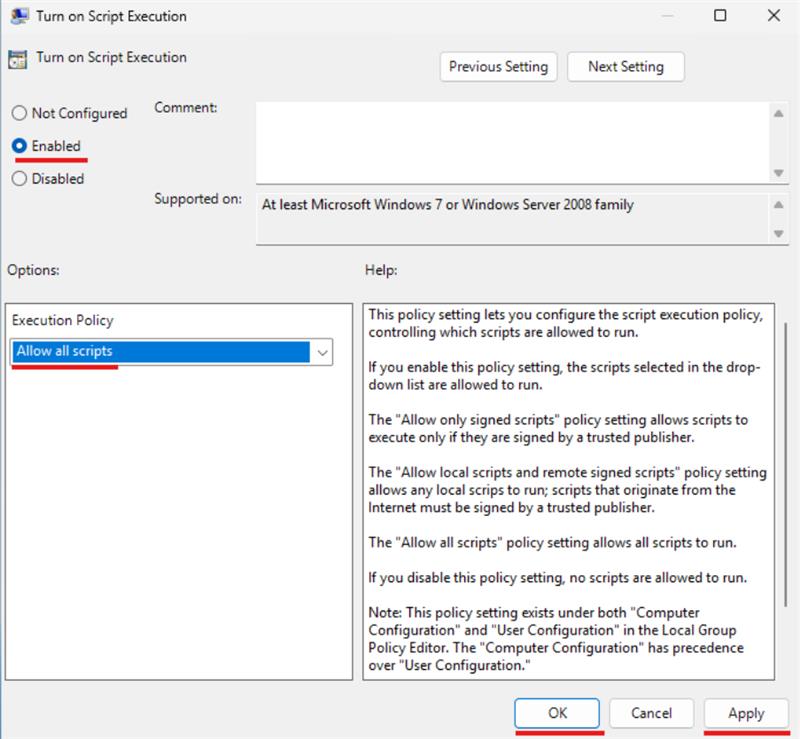
Set to Enabled and choose Allow all scripts, then click Apply and OK. In hardened environments, consider a more restrictive policy only if your deployment process supports it.
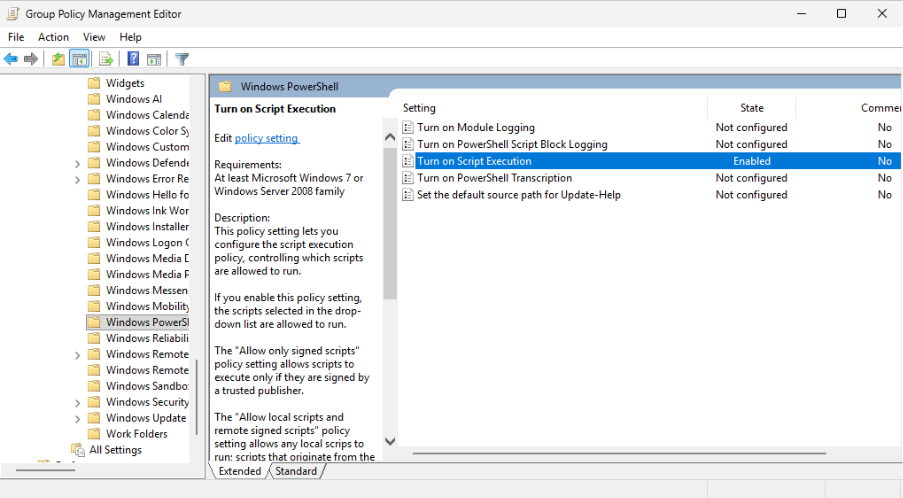
Verify that script execution is enabled before proceeding to client testing.
Step 9: Trigger policy from client machine
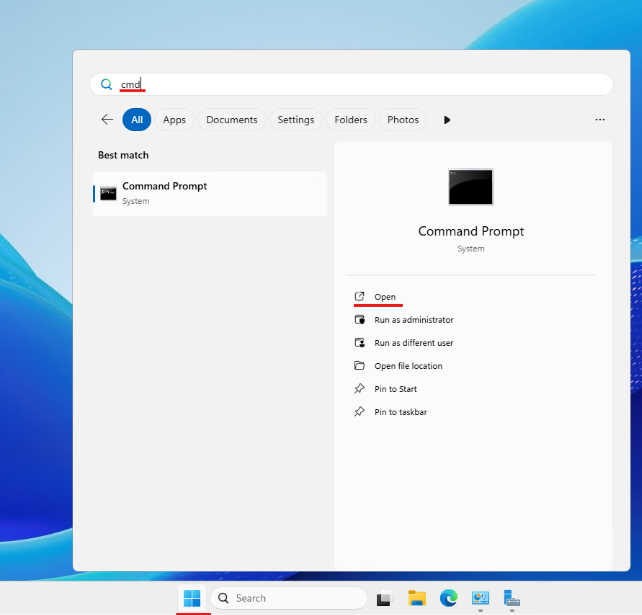
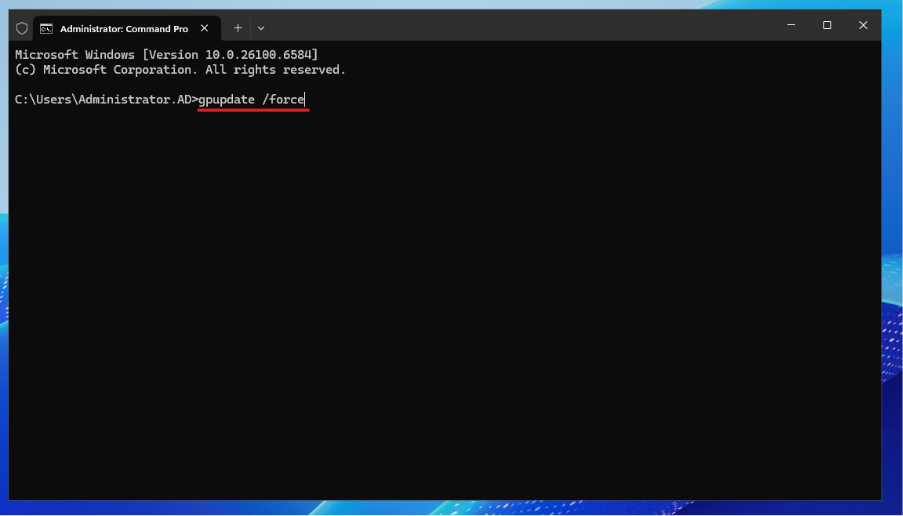
On a client PC, open Command Prompt to force a Group Policy refresh and validate deployment on a representative endpoint.
Run policy update and restart if needed. A reboot ensures startup scripts execute and the MSI install completes before users begin working on the machine.
After restart, wait a few minutes for the startup script to run and the agent service to initialize. scani5 Agent should be installed and running; confirm registration in the scani5 dashboard under the target asset inventory.

scani5 Agent is installed and ready to run on Windows systems. The agent will begin reporting asset and vulnerability data to your scani5 platform, contributing to continuous exposure visibility across your environment.